
Mai dearest friend said that she enjoyed reading about the castle history more than the dry wordy post about the particulars of construction. I will try to include a little of both as it is my hope that a few reading this may be inspired to do the same and find some of the details useful. So let’s get technical…????it’s actually really simple once you know what things are called.
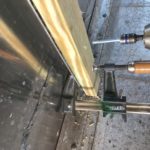
Anyway, after borrowing my buddy’s power washer and thoroughly cleaning the van, I went to Lowe’s and picked up some premium 5/4” treated decking. There are nice sturdy steel ribs on 24” centers going down the walls and ceiling of the van. They stick out 1” from the outer aluminum body. I ripped down the 5/4” decking into strips (they call it 5/4” but it’s actually 1” thick after milling). I got three 1.75” cuts out of each deck board and fastened them to the steel ribs to make my “studs”. This gives me a solid anchor point for attaching things. I pre-drilled pilot holes and used heavy duty 1.5” self tapping lags screws to attach the treated studs.

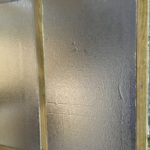
This arrangement gave me a wall depth of exactly 2” to the inner nailing surface of the studs. Perfect for 2” thick foam board. As I mentioned earlier, condensation forming on cold metal can be a problem in a van. You need more than a good vapor barrier to keep the moisture in the air from condensing on the walls. My personal thoughts on this is to use solid foam board insulation, then filling every void, nook, and cranny with spray foam. Purchasing a foam gun for a project like this is a good idea. The straws in the disposable cans always get blocked up if you let them sit. A foam gun is more economical for a bigger project and gives you more control when dispensing the product. Plus you can let it sit between uses without any cleanup.

There are several different types of foam board at places like Lowe’s and Home Depot. The expensive foam, the more expensive foam, and the really expensive foam. I chose to use a moderately expensive 2” foam board with a Mylar reflective backing. It may be tempting to some to throw some cheaper fiberglass insulation in the walls. I have heard people claim that it works with a good vapor barrier in a van, but I don’t think it’s a good idea. If any moisture does penetrate the wall the fiberglass will wick it up like a sponge and cause mold problems. My philosophy is to fill the voids with solid foam either of the expensive type or the more expensive type and seal it off good.

As a side note, I decided to use treated lumber wherever the wood meets the metal surface of the van not only because the 1” thickness was convenient, but also because of its moisture resistance. In construction treated lumber is always used against concrete foundations before transitioning to white wood. This may be unnecessary in a van if you covered the metal with window wrap tape or tar paper before fastening white wood to it. Overkill?…you decide. I also left the treated lumber out in the sun for a bit to dry it out before installing it.
“If you will live like no one else now, later you can live and give like no one else.”
~ Dave Ramsey